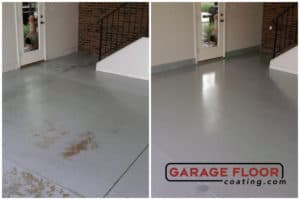
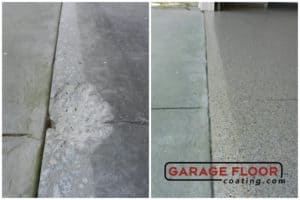
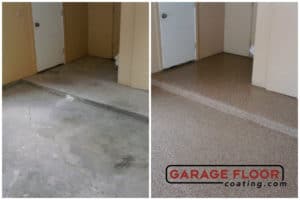
In prior blogs, we’ve covered a lot of topics from concrete preparation and moisture-mitigation to improving the customer experience. But this time around, I’m invoking the “A picture is worth a thousand words” adage by showing several before and after epoxy installs. Nothing gets us more business than showing our customer prospects what their garage could look like!
Peeling Paint

In the “before” photo on the right, the peeling and staining of the paint is apparent. To fix this problem, we used a diamond grinder to remove the existing paint and create a concrete “profile” to which the epoxy primer coat adhered strongly. We then applied a color coat and broadcast flakes into the epoxy producing a subtle, partial-flake epoxy flooring system we call the Premium. Click this link to view various Premium color samples.
Broken and Cracked Concrete

In the photo to the right, we repaired the cracked and broken concrete using a polyaspartic-aggregate mix. Next, we primed the prepared concrete with a moisture-mitigating and a flake epoxy floor color-coat. In this case, we applied mineral mica flakes in a “full-spread” broadcast to produce our Bagari SE coating system.
Click this link to see our many Bagari SE color samples
Moisture Damaged Concrete

Before coating any garage floor, we’ll take multiple moisture readings using a calibrated moisture meter. If the moisture readings are high, we’ll use our moisture-mitigating epoxy as the primer coat. These two-component epoxies provide deep substrate penetration and mitigate moisture issues.
In this case, we coated the gray, vapor-laden concrete with our full-broadcast Ultra coating system. The two clear topcoats, characteristic of these systems, will ensure this garage floor lasts a lifetime. Click this link to view our Ultra color samples.
The Wrap
Convinced by these before and after epoxy installs? Let us transform your ugly gray garage into something you’ll be proud of! GarageFloorCoating.com was founded in 1996 and is a leading innovator in garage floor coating products and techniques. The company has assisted in establishing over 30 franchises and dealerships throughout the US.
Specializing in residential, commercial and industrial epoxy floor coatings and concrete repair, GFC has installed its proprietary coatings in garages, basements, warehouses, airplane hangars, showrooms, retail facilities, walkways, patios, food preparation, and so many more spaces.
About the Author

Share this Post


